Quick Access Toolbar
Quick Access Toolbar Customization Menu
Workbook Tutorials
Welcome to my Excel 2010 Workbook Tutorials. Here is a list of all the Excel 2010 Workbook Tutorials I have created so far.
Macro Tutorials
Welcome to my Macro Tutorials. Here is a list of all the Macro Tutorials I have created so far.
Quick Access Toolbar Customization Menu
The Quick
Access Toolbar Customization Menu allows users to add or remove commands to the
Quick Access Toolbar, Open the Quick Access Toolbar Customization Tab or show
the Quick Access Toolbar above or below the Ribbon.
Adding
Commands
To add
commands using the Quick Access Toolbar Customization Menu check the checkbox
of the preset command located on the Quick Access Toolbar Customization Menu.

Removing
Commands
To remove commands from the Quick Access Toolbar
using the Quick Access Toolbar Customization Menu uncheck the command’s
checkbox.

Opening
the Quick Access Toolbar Customization Tab
The Quick
Access Toolbar Customization Tab allows users to add all the commands in Excel
instead of just the preset commands shown on the Quick Access Toolbar
Customization Menu. To open the Quick Access Toolbar Customization Tab select More Commands.

Show
Above the Ribbon
The Show Above the Ribbon command will move
the Quick Access Toolbar above the Ribbon.

Show
Below the Ribbon
The Show Below the Ribbon command will move
the Quick Access Toolbar below the Ribbon.
See Also:
Quick Access Toolbar Customization Tab
Excel 2010 Quick Access Toolbar
The Quick
Access Toolbar is customizable menu where users can display commonly used
commands for quick access. The commands Save, Undo and Repeat are
generally defaulted to the toolbar. The toolbar can be located in two places.
Adding Commands:
To add
commands to the toolbar users can selected a command from the Quick Access
Toolbar Customization Menu or the Quick Access Toolbar Customization Tab.
Removing Commands:
To remove
command from the toolbar user can simply right click on the command and select Remove from Quick Access Toolbar.
 |
| Remove Command from Quick Access Toolbar |
Display Above Ribbon:
 |
| Quick Access Toolbar Displayed Above Ribbon |
If the toolbar is actively displayed above the ribbon users can select to display the toolbar below the ribbon by right clicking the toolbar and selecting Show Quick Access Toolbar Below the Ribbon.
 |
| Show Quick Access Toolbar Below the Ribbon |
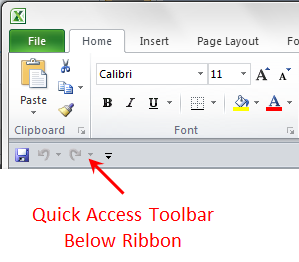
Display Below Ribbon:
 |
| Quick Access Toolbar Displayed Below Ribbon |
If the toolbar is actively displayed below the ribbon users can select to display the toolbar above the ribbon by right clicking the toolbar and selecting Show Quick Access Toolbar Above the Ribbon.
 |
| Show Quick Access Toolbar Above the Ribbon |

Protecting a worksheet
In this tutorial you will learn how to to protect a worksheet using Excel 2010.
A protected worksheet allows the creator of the spreadsheet to specify which cells other users are allowed to select. Protected worksheets use locked and unlocked cells to determine which cells within the worksheet will be able to be selected by users. Protected worksheets also uses numerous other attributes to determine how those cells can be modified by users.
Here are a list of the following ways Excel 2010 worksheets can be protected:
Select Locked Cells
A protected worksheet allows the creator of the spreadsheet to specify which cells other users are allowed to select. Protected worksheets use locked and unlocked cells to determine which cells within the worksheet will be able to be selected by users. Protected worksheets also uses numerous other attributes to determine how those cells can be modified by users.
Here are a list of the following ways Excel 2010 worksheets can be protected:
Select Locked Cells
This option allows users to select and enter data into locked cells. If this option is selected then the Select Unlocked Cells option will automatically be selected.Select Unlocked Cells
This option allows users to select and enter data into unlocked cells.Format Cells
This option allows users to format any cells that are allowed to be selected.Format Columns
This option allows users to format any columns that has selectable cells. For this option to work the Format Cells option needs to be selected as well. Only selectable cells within a column will be formated.Format Rows
This option allows users to format any rows that has selectable cells. For this option to work the Format Cells option needs to be selected as well. Only selectable cells within a row will be formated.Insert Columns
This option allows users to add a new column before a selected column. For this option to work the all the cells within the selected row need to be selectable.Insert Rows
This option allows users to add a new row before a selected row. For this option to work the all the cells within the selected row need to be selectable.Insert Hyperlinks
This option allows users to add a hyperlink to any cell that is selectable while the worksheet is protected.Delete Columns
This option allows users to remove a column from the worksheet. For this option to work the entire column must be selectable.Delete Rows
This option allows users to remove a row from the worksheet. For this option to work the entire row must be selectable.Sort
This option allows users to sort selected cells. For this to work you need to have at least two selectable cells.Use AutoFilter
This option allows users to filter selectable cells. For this to work you need to have more than one selectable cell.Use PivotTables reports
This option allows users to edit already created pivot tables.Edit Objects
This option allows users to add, edit or delete objects to a worksheet. This is one of the few areas where you can add items over unselectable cells.Edit Scenarios
This option allows users to edit scenarios within a worksheet.
How to Encrypt a Workbook with a Password
In this tutorial I will teach you how to encrypt a workbook with a password.
By encrypting a workbook with a password you can make Excel users to enter a password to open your workbook. This allows you to control who can open your workbook.
For this tutorial you will need to have a workbook already open within Excel 2010.
Step 1: Open File Menu

Step 2: Select Info Tab

Step 3: Select Protect Workbook Menu

Step 4: Select Encrypt with Password

This will open the Encrypt Document Window. This is where you decide what password will be used to open your workbook.

Notice this window warns you that if you forget your password, it can not be recovered.
Step 5: Enter a Password into Encrypt Document Window

Notice you will see 4 black dots represents your password, but Excel hides the actual values so no one can watch you type it in.
If you select Cancel the Encrypt Document Window will close and you will return to the Info Tab located on the File Menu.Step 6: Select OK
The Confirm Password Window will open.

If you select Cancel the Confirm Password Window will close and the Encrypt Password Window will reopen.
Step 7: Reenter Password into Confirm Password Window

Step 8: Select OK
If you don't enter the same password that you entered into the Encrypt Document Window then you will be prompted with the following popup.

If you see this pop up then just select OK and you will return to Confirm Password Window.
If you entered the same password that you entered into the Encrypt Document Window then you have successful Encrypted your workbook with a password. You will see the following on the Info Tab, located within the File Menu.

Formula Tutorials
Welcome to my Excel 2010 Formula Tutorials. Here is a list of all the Excel 2010 Formula Tutorials I have created so far.
How to Enter Data into a cell using the Formula Bar
In this tutorial I will teach you how to enter data into a cell within an Excel 2010 worksheet using the formula bar.
This is a very basic tutorial, but I want to ensure that everyone understands this so they can follow along with my future tutorials.
For this tutorial you will need a workbook open within Excel 2010.
There are two basic ways two enter data in Excel 2010:
This is a very basic tutorial, but I want to ensure that everyone understands this so they can follow along with my future tutorials.
For this tutorial you will need a workbook open within Excel 2010.
There are two basic ways two enter data in Excel 2010:
- Typing into the cell
- Formula bar
Both of these ways provide the same result. They both have their advantage and disadvantage. If all you want to do is type one value or a short value then you will mostly like just select the cell you want and start typing. However, if you want to enter a lot of data or enter a formula you might like the formula option because it allows you to see more of what you are entering.
For the purpose of this tutorial we will use the second option of entering the data into the formula bar.Step 1: Select a cell within the Excel 2010 workbook.
It doesn't matter which cell it is. For the purpose of my tutorial I chose the very first cell A1.

Notice the black outline where column A meets row 1 this is cell A1. That black outline tells you which cell is selected.Step 2: Select Formula Bar
The formula bar is outlined in red below. Left click inside the white area of the formula bar and you will see the cursor appear as seen below in the red outlined area.
Step 3: Enter data into the formula bar
Type anything you want. It doesn't matter for the purpose of this tutorial I typed the number 1.

Notice is this picture you see the keyboard cursor to the right of the number 1 that I entered already. This is just saying that if you keep typing it will keep adding whatever you type to that cursor location.Congratulations, you have entered data into a a cell within an Excel 2010 worksheet. Feel free to check out my Cell Tutorials and my Formula Tutorials .
Cell Tutorials
Welcome to my Excel 2010 Cell Tutorials. Here is a list of all the Excel 2010 Cell Tutorials I have created so far.
How to Enter Data into a Cell
In this tutorial I will teach you how to enter data into a cell within an Excel 2010 worksheet.
This is a very basic tutorial, but I want to ensure that everyone understands this so they can follow along with my future tutorials.
For this tutorial you will need a workbook open within Excel 2010.
There are two basic ways two enter data in Excel 2010:
- Typing into the cell
- Formula bar
Both of these ways provide the same result. They both have their advantage and disadvantage. If all you want to do is type one value or a short value then you will mostly like just select the cell you want and start typing. However, if you want to enter a lot of data or enter a formula you might like the formula option because it allows you to see more of what you are entering.
For the purpose of this tutorial we will use the first option of just selecting the cell we want and start typing.Step 1: Select a cell within the Excel 2010 workbook.
It doesn't matter which cell it is. For the purpose of my tutorial I chose the very first cell A1.
Notice the black outline where column A meets row 1 this is cell A1. That black outline tells you which cell is selected.Step 2: Enter data
Type anything you want. It doesn't matter for the purpose of this tutorial I typed the number 1.

Notice is this picture you see the keyboard cursor to the right of the number 1 that I entered already. This is just saying that if you keep typing it will keep adding whatever you type to that cursor location.
In the blue outlined area is the Name Box. By default the name box displays the selected cell.Congratulations, you have entered data into a a cell within an Excel 2010 worksheet. Feel free to check out the rest of my Cell Tutorials.
In the red outlined area is the formula bar. Notice that in the formula bar that number one is also shown, but without the keyboard cursor. The formula bar will always show the value of the cell unless the value of the cell is the result of an equation.
Function - ABS
Welcome to my Function Tutorials.
In this tutorial I will teach you how to use the ABS function within Excel 2010.
ABS (Number) is a function within Excel that allows users to
return the absolute value of a number. The absolute Value of a number is the
number without a sign.
Example:

In column 1, I added 4 numbers two are positive two are
negative notice that when I used the ABS
function the result was the same for 1
as it was for -1.
Function Tutorials
Welcome to my Excel Function Tutorials. Here is a list of all the Excel Function Tutorials I have created so far:
How to Create an Excel 97-2003 Workbook
Welcome to my Workbook Tutorials.
Step 1: Begin by opening Excel 2010.
In this Tutorial I will teach you how to create an Excel 97-2003 Workbook within Excel 2010.
An Excel 97-2003 Workbook is used to allow users to be able to open the workbook with Excel 97 – Excel 2003 versions.
Step 1: Begin by opening Excel 2010.
If you already have Excel 2010 open you don't need worry about opening it again.Step 2: Save the workbook as Excel 97-2003 Workbook
Open File menu.

Select Save (This will open the Save As window).

Select File Address.

Enter File Name.

Change the Save As Type to Excel 97-2003 Workbook.

Select Save.Congratulations. You have created an Excel 97-2003 Workbook. For a complete list of all my macro tutorials open Workbook Tutorials.
How to Create a Binary Workbook
Welcome to my Workbook Tutorials.
Step 1: Begin by opening Excel 2010.
In this Tutorial I will teach you how to create a Binary Workbook within Excel 2010.
A Binary Workbook is used to allow for a large amount of data to be entered into the workbook. A binary workbook also allows users to store macros within the workbook. The main reason to not use a binary workbook is if there is possibility that someone with an earlier version of Excel may try to open that workbook. Some versions of Excel will not open a binary workbook.
Step 1: Begin by opening Excel 2010.
If you already have Excel 2010 open you don't need worry about opening it again.Step 2: Save the workbook as Excel Binary Workbook
Open File menu.
Select Save (This will open the Save As window).
Select File Address.
Enter File Name.
Change the Save As Type to Excel Binary Workbook.
Select Save.Congratulations. You have created a Binary Workbook. For a complete list of all my macro tutorials open Workbook Tutorials.
How to Create a Macro-Enabled Workbook
Welcome to my Tutorials.
In this Tutorial I will teach you how to create a Macro-Enabled Workbook within Excel 2010.
A Macro-Enabled Workbook is used when the user wants to create and use macros within their workbook.
Step 1: Begin by opening Excel 2010.
If you already have Excel 2010 open you don't need worry about opening it again.Step 2: Create a macro
Technically you don't need a macro to create a Macro-Enabled Workbook. However, why would you make it Macro-Enabled if you had no macros?Step 3: Save the workbook as Macro-Enabled Workbook
For the purpose of this tutorial I will assume that you already know how to create a macro. If you need help creating a macro feel free to read my How to Create a Macro tutorial.
Now that we have Excel 2010 open and have created a macro we are ready to save the workbook as a Macro-Enabled Workbook.
Open File menu.
Select Save (This will open the Save As window).
Select File Address.
Enter File Name.
Change the Save As Type to Macro-Enabled Workbook.

Select Save.Congratulations. You have created a Macro-Enabled Workbook. For a complete list of all my macro tutorials open Workbook Tutorials.
How to Create an Excel Workbook
Welcome to my Excel Workbook Tutorials. In this tutorial I will teach you how to create a new Excel workbook within Excel 2010.
Step 1: Open the File Menu.
Step 2: Select New from the File Menu.

Congratulations. You have created an Excel workbook using Excel 2010. Feel free to view the more of my Excel 2010 Workbook Tutorials.
Step 1: Open the File Menu.
File Menu Location
Step 2: Select New from the File Menu.
You should see the following window now.

Notice the the File Menu is still open to the left and New is highlighted green. This just shows that right now you have the new workbook command selected. To the right of the File Menu you will see the new workbook options. For the purpose of this tutorial you don't need to know the purpose of every option within this section.Step 3: Double click Blank Workbook.
Congratulations. You have created an Excel workbook using Excel 2010. Feel free to view the more of my Excel 2010 Workbook Tutorials.
How to Create a Macro
Welcome to my Macro Tutorials. In this tutorial I will teach how to create a macro. For a complete list of all my macro tutorials feel free to check out my Macro Tutorials.
There are two ways to create a macro in Excel 2010.
Select the Macro Menu drop down arrow to open the Macro Menu.
Select the Record Macro. This will open the Record Macro Window.
Congratulations. You have created a macro.
There are two ways to create a macro in Excel 2010.
- First you can select Create from within the Macro Window. This will only create a blank macro with no purpose until you edit. This is primarily used if you are familiar with the programming language used to create macros.
- The other way to create a macro within Excel 2010 is by using the Record command located on the Macro Menu in the View Tab.
For the purpose of this tutorial we will use the second option.
Select View from the ribbon tabs.
View Tab

Select the Macro Menu drop down arrow to open the Macro Menu.
Macro Menu - Record Macro

Select the Record Macro. This will open the Record Macro Window.
Record Macro Window

In this window you have the option to change the macro name, create a shortcut key and decide where you want to store your macro and provide a description. For the purpose of this tutorial the only thing that matters is the name. You can select what ever Excel chose for your or you can create you own name it doesn't matter as long as you understand that you don't want to create to macros with the same name.Select OK.
This will begin to record your macro. Anything you do in within Excel from now until you select Stop Recording from the Macro Menu will be saved to this macro. Perform a few functions. Change a cell color, add data, it doesn't matter what it is for the purpose of this tutorial.Now reopen the Macro Menu.
Macro Menu - Stop Recording

Notice now Record Macro has been replaced by Stop Recording. This is how you will tell you macro to stop recording everything you do in Excel.Select Stop Recording.
Congratulations. You have created a macro.
How to Edit a Macro
Welcome to my Macro Tutorials. For a list of all my Macro Tutorials feel free to check out my Macro Tutorials.
In the previous tutorial we created a new macro named GoodJob. In this tutorial I will teach you how to edit that GoodJob macro. If you have not been following along you just need to make a new macro named GoodJob. If you don't know how to make a new macro feel free to read How to Create a Macro.
Lets Get Started.
Step 1: Open the Macro window.
Step 2: Select GoodJob from the list of macros Names.
Step 3: Select Edit to open the Visual Basic for Applications window.
Step 4: Enter MsgBox "Good Job" inside GoodJob VBA Procedure outlined in red below.
Congratulations. You edited a macro. For the purpose of this tutorial you don't need to know what MsgBox "Good Job" means. Instead all you need to understand is that everything you want to have the macro run needs be between the Sub and End Sub lines.
In the next tutorial I will teach you How to Run a Macro.
In the previous tutorial we created a new macro named GoodJob. In this tutorial I will teach you how to edit that GoodJob macro. If you have not been following along you just need to make a new macro named GoodJob. If you don't know how to make a new macro feel free to read How to Create a Macro.
Lets Get Started.
Step 1: Open the Macro window.
 |
| Macro Window |
Step 3: Select Edit to open the Visual Basic for Applications window.
 |
| Visual Basic for Applications Window |
Congratulations. You edited a macro. For the purpose of this tutorial you don't need to know what MsgBox "Good Job" means. Instead all you need to understand is that everything you want to have the macro run needs be between the Sub and End Sub lines.
In the next tutorial I will teach you How to Run a Macro.
Subscribe to:
Posts (Atom)